
![[ununtu22.04] Carla Autoware.universe Bridge](https://img1.daumcdn.net/thumb/R750x0/?scode=mtistory2&fname=https%3A%2F%2Fblog.kakaocdn.net%2Fdn%2FFkJhj%2FbtsH0Wt4xyj%2FkOCGjSKnkXKf078kASYEKK%2Fimg.png)

Desktop software spec
- Ubuntu22.04
- nvidia-driver-555
- ROS2(Humble)
- CARLA 0.9.15
- Autoware(Universe)
출처
https://github.com/TUMFTM/Carla-Autoware-Bridge?tab=readme-ov-file
GitHub - TUMFTM/Carla-Autoware-Bridge: Carla 0.9.15 and Autoware Universe Humble
Carla 0.9.15 and Autoware Universe Humble. Contribute to TUMFTM/Carla-Autoware-Bridge development by creating an account on GitHub.
github.com
설치영상
https://www.youtube.com/watch?v=OmnMnvz949Y
설치
1. CARLA docker
터미널 3개 열어두기
먼저, 첫 번째 terminal
docker pull ghcr.io/autowarefoundation/autoware-universe:humble-2024.01-cuda-amd64git clone https://github.com/autowarefoundation/autoware.gitcd autowaregit checkout v1.0
rocker --network=host -e RMW_IMPLEMENTATION=rmw_cyclonedds_cpp -e LIBGL_ALWAYS_SOFTWARE=1 --x11 --nvidia --volume /path/to/code -- ghcr.io/autowarefoundation/autoware-universe:humble-2024.01-cuda-amd64이 명령어 칠 때 /path/to/code 부분에 방금 clone한 autoware의 상위 디렉토리 경로를 적으셔야 합니다.
rocker --network=host -e RMW_IMPLEMENTATION=rmw_cyclonedds_cpp -e LIBGL_ALWAYS_SOFTWARE=1 --x11 --nvidia --volume /path/to/code -- ghcr.io/autowarefoundation/autoware-universe:humble-2024.01-cuda-amd64
제 예시)
rocker --network=host -e RMW_IMPLEMENTATION=rmw_cyclonedds_cpp -e LIBGL_ALWAYS_SOFTWARE=1 --x11 --nvidia --volume /home/hoon -- ghcr.io/autowarefoundation/autoware-universe:humble-2024.01-cuda-amd64
도커환경 내부 접속 후 로컬에서 clone한 autoware 경로로 이동

cd /home/hoon/autowaremkdir src && vcs import src < autoware.reposcd src && git clone https://github.com/TUMFTM/Carla_t2.gitcd ..colcon build --symlink-install --cmake-args -DCMAKE_BUILD_TYPE=Release
colcon build 시 c++: fatal error: Killed signal terminated program cc1plus와 같은 에러가 난다면
build 작업량이 커 메모리 부족 현상이 일어날 가능성이 큽니다.
이때는 프로세서 개수 지정 옵션과 페러렐 옵션을 조정해 해결할 수 있습니다.
(위 colcon build가 성공했다면 아래 코드는 무시)
MAKEFLAGS="-j2" colcon build --symlink-install --cmake-args -DCMAKE_BUILD_TYPE=Release --parallel-workers 2
두 번째 terminal
autoware 디렉토리에 있는 곳에 Carla-Autoware-Bridge clone (저의 경우 /home/hoon/)
git clone https://github.com/TUMFTM/Carla-Autoware-Bridge.gitcd Carla-Autoware-Bridge./docker/build.sh
세번째 terminal
CARLA 0.9.15 버전 도커 pull
docker pull carlasim/carla:0.9.15
autoware 파일 내용 수정(2가지)을 위해 vscode ON
1. /autoware/src/launcher/autoware_launch/launch/autoware.launch.xml
config_dir부분 수정 (71 line)
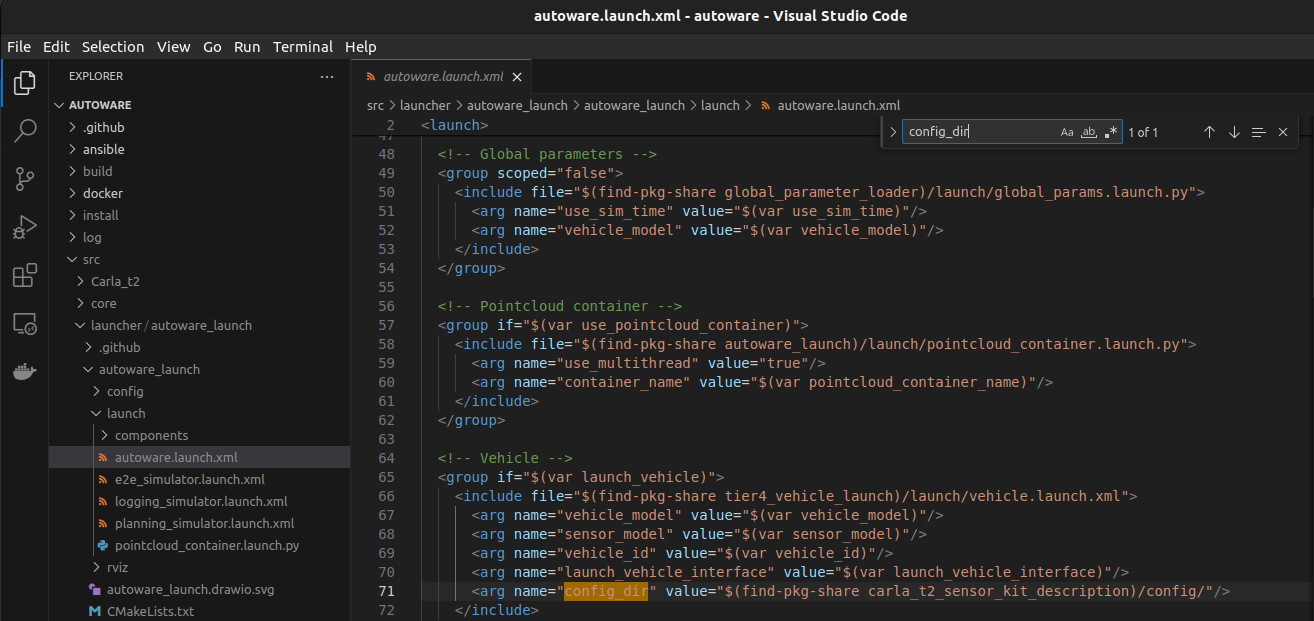
config_dir줄 전체를 아래 코드로 바꿔줍니다.
<arg name="config_dir" value="$(find-pkg-share carla_t2_sensor_kit_description)/config/"/>
2. /autoware/src/launcher/autoware_launch/launch/components/tier4_localization_component.launch.xml
#input_pointcloud 부분 수정 (7 line)

# input_pointcloud
<arg name="input_pointcloud" default="/sensor/lidar/front" description="The topic will be used in the localization util module"/>
# container name
<arg
    name="lidar_container_name"
    default="/sensing/lidar/front/pointcloud_preprocessor/pointcloud_container"
    description="The target container to which lidar preprocessing nodes in localization be attached"
  />
docker 환경인 첫 번째 터미널에서 colcon build를 다시 해줍니다.
autoware_launch 패키지만 수정했으므로 이 패키지만 새롭게 빌드 합니다.
colcon build --packages-select autoware_launch
환경세팅은 모두 완료 했으므로 이후 exit로 첫 번째 터미널의 도커 환경을 나가줍니다.
실행
실행 부분도 3개의 터미널에 CARLA / CARLA-AUTOWARE Bride / AUTOWARE 세 부분으로 나눠 각각의 터미널에서 실행합니다.
1. CARLA 시작 (terminal 1)
docker run --privileged --gpus all --net=host -e DISPLAY=$DISPLAY carlasim/carla:0.9.15 /bin/bash ./CarlaUE4.sh -carla-rpc-port=1403
CARLA 프로그램이 실행됩니다.
2. CARLA-AUTOWARE Bride 실행 (terminal 2)
docker run -it -e RMW_IMPLEMENTATION=rmw_cyclonedds_cpp --network host tumgeka/carla-autoware-bridge:latestros2 launch carla_autoware_bridge carla_aw_bridge.launch.py port:=1403 town:=Town10HD
3. AUTOWARE 실행 (terminal 3)
rocker --network=host -e RMW_IMPLEMENTATION=rmw_cyclonedds_cpp -e LIBGL_ALWAYS_SOFTWARE=1 --x11 --nvidia --volume /home/hoon -- ghcr.io/autowarefoundation/autoware-universe:humble-2024.01-cuda-amd64cd /home/hoon/autowareros2 launch autoware_launch e2e_simulator.launch.xml vehicle_model:=carla_t2_vehicle sensor_model:=carla_t2_sensor_kit map_path:=/home/hoon/autoware_map/Town10
실행만 하고 싶을 때

위 과정을 통해 저희가 저장한 빌드가 남아있는 도커 컨테이너가 생성되었기 때문에 다음 실행 때는 기존 컨테이너 실행만 시키면 됩니다.
1. terminal 1 (carla 실행)
docker run --privileged --gpus all --net=host -e DISPLAY=$DISPLAY carlasim/carla:0.9.15 /bin/bash ./CarlaUE4.sh -carla-rpc-port=1403
2. terminal 2 (carla-autoware bridge 실행)
docker run -it --rm -e RMW_IMPLEMENTATION=rmw_cyclonedds_cpp --network host tumgeka/carla-autoware-bridge:latestros2 launch carla_autoware_bridge carla_aw_bridge.launch.py port:=1403 town:=Town10HD
3. terminal (autoware 실행)
rocker --network=host -e RMW_IMPLEMENTATION=rmw_cyclonedds_cpp -e LIBGL_ALWAYS_SOFTWARE=1 --x11 --nvidia --volume /home/hoon -- ghcr.io/autowarefoundation/autoware-universe:humble-2024.01-cuda-amd64cd /home/hoon/autowaresource /home/hoon/autoware/install/setup.bash
ros2 launch autoware_launch e2e_simulator.launch.xml vehicle_model:=carla_t2_vehicle sensor_model:=carla_t2_sensor_kit map_path:=/home/hoon/autoware_map/Town10